Find Solutions in Our Knowledge Base
Create and Manage FTP Accounts in VestaCP
In this tutorial, we can discuss about how to create and manage FTP accounts in VestaCP.
Follow the below steps to create FTP account.
1) Login to your VestaCP using the link https://serverip:8083.
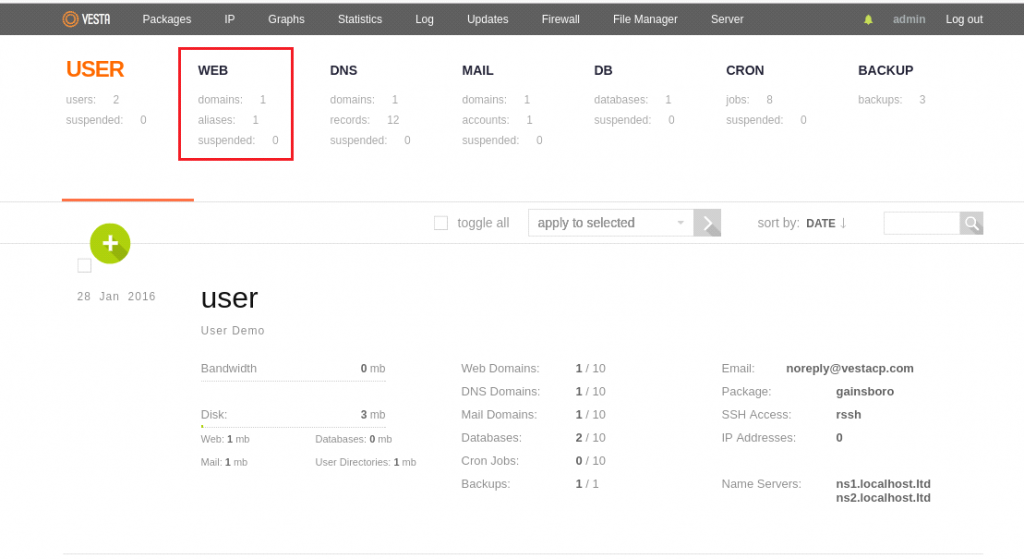
2) Click the option ‘Web’ from the menu bar along the top.
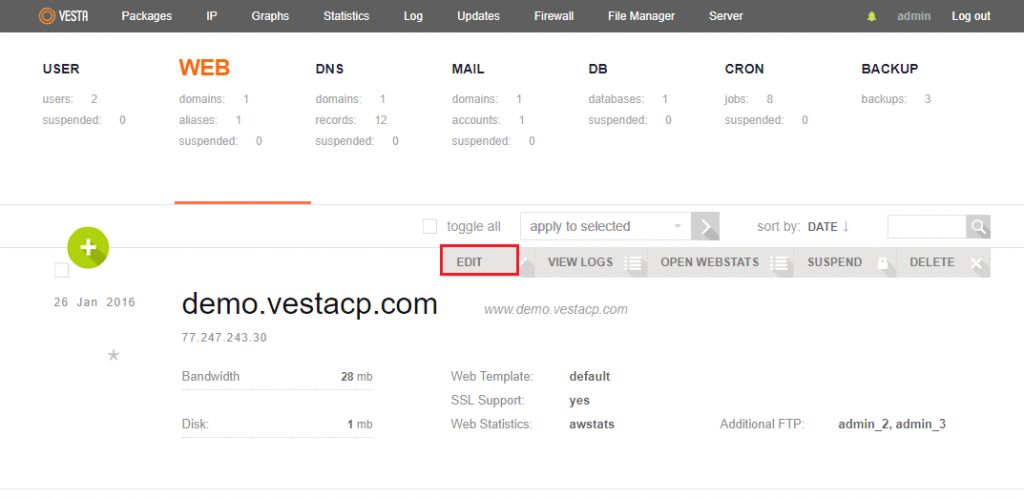
3) Select the domain you want to create FTP account and click on ‘Edit’ button to create FTP account for that domain
4) Scroll down the page and click the Additional FTP option.
5) Complete the following fields:
Username: The FTP username for the added account.
Password: FTP password for the account.
Path: (Optional) Enter if you would like to restrict FTP access to a specific folder path.
Send FTP credentials to email: (Optional) Enter an email address to send the account details to.
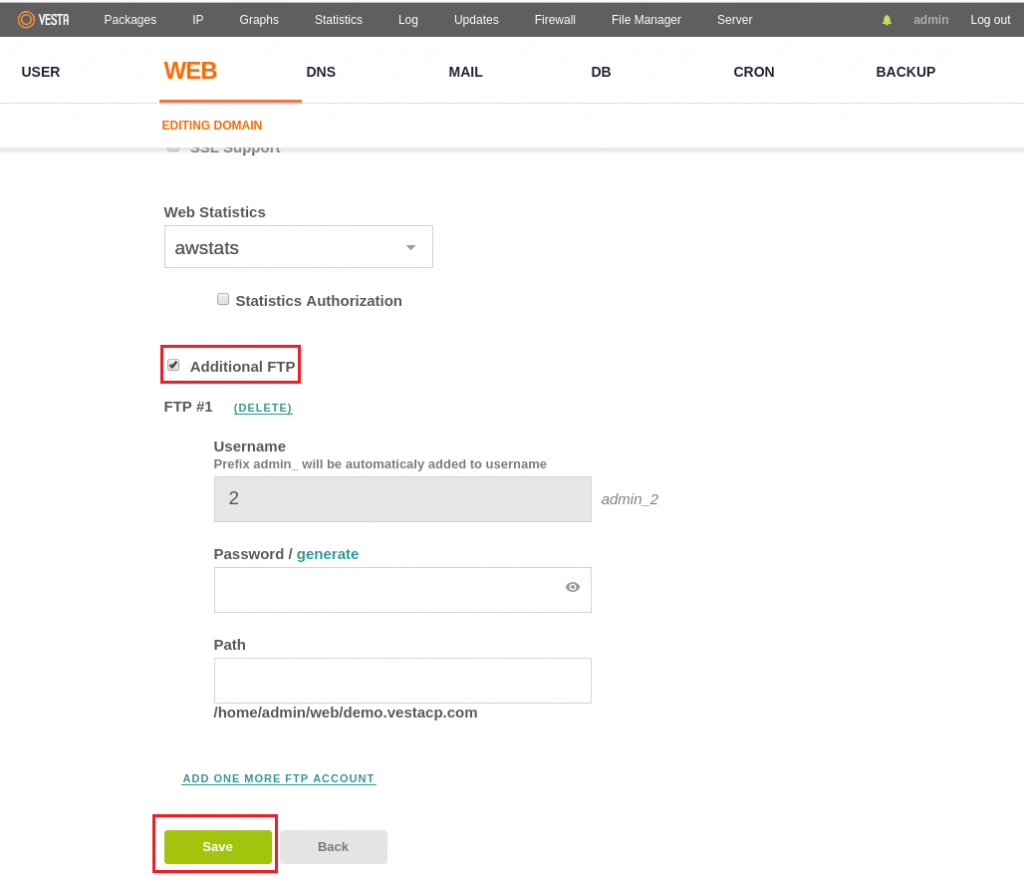
6) Click ‘Save’ button to create the FTP account.
7) If you want to create more FTP accounts, you can select the option “ADD ONE MORE FTP ACCOUNT”
you can now use following details to upload data to your website:
Host name or IP: IP address of your server.
FTP User name: Username that you have entered.
Password: Password that you have entered
You can use FileZilla client to upload data to your website.
If you need any further help, please reach our support department at [email protected]
VestaCP: Simplifying FTP Account Creation and Management
WebHostingPeople
- Discover What Makes WebHostingPeople a Global Leader in Web Hosting
- Find Out How WebHostingPeople Can Accelerate Your Small Business Success
- How does WebHostingPeople provide reliable web hosting services?
- How long have you been in business?
- How secure is WebHostingPeople's hosting platform?
- Is WebHostingPeople's Hosting Right for Beginners?
- What are the advantages of transferring my domain/website/web hosting to WebHostingPeople?
- How long have you been in business?
- Find Out How WebHostingPeople Can Accelerate Your Small Business Success
- Is WebHostingPeople's Hosting Right for Beginners?
- How secure is WebHostingPeople's hosting platform?
- How does WebHostingPeople provide reliable web hosting services?
- Discover What Makes WebHostingPeople a Global Leader in Web Hosting
- What are the advantages of transferring my domain/website/web hosting to WebHostingPeople?
- Discover What Makes WebHostingPeople a Global Leader in Web Hosting
- Find Out How WebHostingPeople Can Accelerate Your Small Business Success
- How does WebHostingPeople provide reliable web hosting services?
- How long have you been in business?
- How secure is WebHostingPeople's hosting platform?
- Is WebHostingPeople's Hosting Right for Beginners?
- What are the advantages of transferring my domain/website/web hosting to WebHostingPeople?
- Do you have a refund policy?
- Do you offer a trial period or a satisfaction guarantee?
- What are the available payment frequency options?
- What is the pricing for hosting a website in India?
- What payment methods do you accept?
- Is assistance available for migrating my website from another host to WebHostingPeople?
- Is it possible to upgrade my web hosting plan at a later time?
- What is the quality of technical support provided by WebHostingPeople?
- Are WebHostingPeople's Hosting Services Suitable for Individuals with Limited Technical Expertise?
- Is It Possible to Purchase Hosting Separately from a Domain Name?
- What Are the Essential Features to Consider in a Web Hosting Service?
- What types of web hosting services do you provide?
- Show all articles (11) Collapse Articles
Billing and Pricing
Support and Migration
Product and Services
All in One Unlimited Hosting-Left
- Understanding Shared Hosting Websites
- Are all your websites hosted on one shared plan?
- Ready to Make the Switch to a Superior Plan?
- Requesting Assistance – Where to Go?
- Are any databases available on the web server for my use?
- What email hosting is included with my package?
- Can I divide my Shared Hosting package and resell it?
All in One Unlimited Hosting-Right
Reseller Hosting Left
Reseller Hosting Right
VPS Hosting FAQ Left
- What are the advantages of VPS Hosting?
- What is a KVM VPS?
- What is the difference between KVM and OpenVZ?
- What hosting panels are supported with HDD and SSD type plans ?
- What kind of support do you offer?
- What is the scope of support for unmanaged servers?
- How can I get my website transferred for free?
- What is the advantage of the Server Administration Panel?
VPS Hosting FAQ Right
Domain Registration Left
Domain Registration Right
- Why should I keep my domain name registered?
- What do I need in order to register a Domain Name or how to get a domain name?
- What is the Domain Name Registration Process or how to buy a domain name?
- Can I register more than one Domain Name at a time?
- I don’t have a Website, Can I still register a Domain Name?
- Registration Waiting Time for Domain Name?
- How do I know if I have registered a Domain Name successfully?
Dedicated Server Left
- What is Rapid Deploy Dedicated Servers?
- What types of users benefit from Rapid Deploy Bare Metal Dedicated Servers?
- What is the difference between managed and unmanaged dedicated hosting?
- What should I consider when choosing a Rapid Deploy Dedicated Server provider?
- Do you offer free migration for your dedicated server?
- What are the Operating System (OS) options available?
- How do I access my Dedicated Server?
Dedicated Server Right
- What is the difference between VPS vs Dedicated Hosting?
- How do Rapid Deploy Bare Metal Dedicated Servers differ from regular dedicated servers?
- Does WebHostingPeople provide managed dedicated servers?
- What will be the server location of my dedicated server?
- Can I get different specifications from the ones mentioned on your website?
WebSitePanel
General
Email Tutorial
- How to Resolve the Outlook Error 0x800ccc0b When Sending Emails
- Email Management in Plesk
- Tips to Block Email Spam with Postfix SMTP Server
- How to Set Mail Server in DirectAdmin?
- Customize Exim System Filter File
- Processing Email With Procmail
- Email Deliverability in WHM
- Restore Exim Configuration
- Types of Email Marketing
- LMTP ( Local Mail Transfer Protocol ) in cPanel
- MailChannels common mail bounce back errors
- Reset Mailman Password from WHM
- Difference Between Maildir and Mbox's Directory Structure
- Extended Exim Logging
- How to Configure Email Piping in WHMCS?
- How to Fix the Error “The mail server detected your message as spam and has prevented delivery”?
- Mail Delivery Reports in WHM
- How to Enable Outgoing Spam Filtering Using SpamAssassin?
- How to Automatically Empty Trash Folder for Mails
- Mailbox Conversion in WHM
- What is MailChannels Cloud
- Handle Bounce Back Emails in phpList
- Enable Email Alerts in Keepalived
- How to Check if an Email Address Really Exists Without Sending an Email
- Track Delivery of Email in cPanel
- cPanel Email Encryption Explained
- How to Install SpamAssassin, MailScanner, ClamAV in CentOS Mail server
- Manage Email Disk Usage in cPanel
- How to create catch-all email address in cPanel
- SMTP Status Codes and Meanings
- How to Limit Emails Per Hour in WHM?
- How to Disable Mass Mail in Joomla?
- Configure Mail Settings in Joomla
- How to Backup and Restore Emails in Roundcube
- About Zimbra-Email Server Collaboration
- All about Junk Email Filter
- Important Postfix Configuration Settings
- Mass Mail Setup and Configuration in OpenCart
- What is Sendmail? Sendmail Configuration and Details
- How To Stop Email Going To Recipients Spam Box?
- How to Ban Emails in phpBB
- Mass Email Settings in phpBB
- How to Add an Email Account in Webuzo?
- How to Clear Default Mail Account in a cPanel Server
- About Email Policy, Email Quota and Email Limits
- All You Need to Know About Email Reputation
- Email Greylisting. How does greylisting work?
- Features and Details of Qmail MTA
- How To Install Postfix From Source
- How to Setup Email Forwarding in Webuzo
- Linux Mail Command Usage with Examples
- SPF and DKIM Records - Detailed Overview
- What is MIME ( Multi-Purpose Internet Mail Extensions )
- Configure the Number of Outgoing Messages in Plesk
- Dovecot - A detailed explanation
- What is a Proper Email Structure?
- Exactly How Emails Works - Steps and Explanation
- Manage Exim Mail Queue in WHM
- Understanding Bounce Back Emails
- Useful Exim Commands with examples
- Setup Email Account in Microsoft Outlook
- Disable Email Notifications Sent by Softaculous
- Manage Banned Emails in WHMCS
- Manage Email Marketer in WHMCS
- Manage Email Templates in WHMCS
- Manage Mass Mail Tool in WHMCS
- Spam Prevention Methods in cPanel
- Access Emails
- Forward Domain’s email to Gmail
- Set up Email Account in Thunderbird
- How to Use Google’s Free SMTP Server
- How to configure Email in Mac?
- Set up Mail Fetching at Hotmail
- Guaranteed Email Delivery
- Set up Mail Fetching at Gmail
- Thunderbird error: weak ephemeral Diffie-Hellman key error
- Spam Filter Settings in Plesk
- How to Send Bulk Email to Customers in Plesk
- Email Client Configuration
- Manage Email Accounts in cPanel
- WebHostingPeople Email Account Settings
- What can I do to reduce SPAM?
- What is my POP server?
- What is SpamAssassin?
- When using PINE what should the SMTP setting be?
- My SMTP port 25 is Blocked by my ISP
- Neomail shows no messages even though I can see them through pop and imap
- Spam Assassin - WebHostingPeople Tips
- Mailing Lists - WebHostingPeople Tips
- Outlook Email Being Sent "On Behalf Of"
- Mailman bounces emails with Unroutable Domain
- MOJO Mail tells me Inappropriate ioctl for device
- Error when sending email
- Gmail MX Record Changes
- How to setup and configure SMTP Server on Windows Server 2008 R2
- Can I change the MX records on my account?
- Email Accounts - WebHostingPeople Tips
- Show all articles (82) Collapse Articles
MySQL
- Establishing a Connection to a MySQL Database with PHP on Linux Hosting
- How to Create and Manage FTP Accounts in VestaCP
- To enable remote connections to MySQL and secure them on Ubuntu 16.04
- To set up Master-Slave replication in MySQL Server 5.7
- Installation of NexusCore and SQL Server 2017 in WHM
- How to upgrade MariaDB from version 10.0 to 10.3 on Ubuntu 16.4
- AutoMySQL Backup installation and configuration on Centos
- Here is a guide on optimizing your MySQL database using phpMyAdmin in Plesk.
- How to configure Master-Master replication in MySQL on Ubuntu
- How to Reset MySQL root password in Ubuntu
- How to use the Command Line to Import and Export Databases in MySQL
- Managing MySQL databases using the command line
- Managing MySQL users through the command line
- Securing MySQL connections using SSL on Ubuntu
- The comprehensive manual for mysqldump - An efficient program for backing up databases
- The size of MySQL databases is displayed as 0MB in cPanel
- How to install Nginx, MySQL, and PHP (LEMP stack) on Ubuntu 16.04
- Steps to Install and Setup PhpWiki
- How to Change MySQL Server Time Zone
- How to Repair Databases in cPanel
- Install MariaDB in Linux Server
- Installation and Details of MySQL Pinba storage engine
- Installation of XAMPP in Linux and Windows
- MySQL Error - The Server Quit Without Updating PID File
- OwnCloud: The Private Cloud-Installation Guide
- What is MySQL Query Caching?
- How to Prevent an SQL Injection Attacks and Remote Code Execution
- Importing .sql file in MySQL via command line and phpMyAdmin
- How to backup a MySQL database using PhpMyAdmin
- How to use MYISAMCHECK and MYSQLCHECK and what they are used for
- MySQL Storage Engines - Types and Details
- Understanding Mambo CMS
- Edit MySQL Config
- How to Run MySQL Query in phpMyAdmin
- PostgreSQL Availability
- Database Management in Plesk
- MySQL FLUSH Commands
- PHPMyAdmin shows every database when logging in as a user
- Where can I access additional resources about MySQL?
- How to Install LAMP Stack on Ubuntu / Debian
- How to Install MySQL on CentOS 7
- How to recover the mysql root password?
- I get incorrect root password when accessing a MySQL Cpanel feature
- Disable MySQL Strict mode
- How can I backup my MySQL Database?
- How can I increase MySQL max connections?
- How can I start and stop mysql?
- How do I allow remote MySQL connections?
- How to Create a DB(DataBase) using the MySQL Database Wizard in cPanel
- Allow Remote IP Address to Access MySQL in cPanel Shared Hosting
- C.5.2.4. Client does not support authentication protocol with php selector
- DEFAULT CHARSET=latin1 or collate latin1_general_ci NOT NULL default or TIMESTAMP errors on importing a database dump
- Show all articles (37) Collapse Articles
cPanel / WHM
- What steps should I take when my browser displays a certificate error while trying to access WHM/cPanel or Plesk control panel?
- cPanel Price Increase And Alternative Control Panels
- Create Website with RVSiteBuilder in cPanel
- Email Account Password Reset in cPanel
- Unable to Access PhpMyAdmin in cPanel
- How to Enable/Disable Cachewall from cPanel Account?
- How to Clone a Git Repository in cPanel?
- New cPanel feature – Backup User Selection
- All about new feature – Domains interface in cPanel
- cPanel Log Rotation Configuration
- Block Email from a Country or Domain in cPanel
- Find the Origin of Spam Emails in cPanel Using Exim
- Softaculous Staging Environment
- Email Migration to cPanel Using Outlook
- cPanel Horde Data Conversion from MySQL to SQLite
- Install Matomo Self-Hosted Analytics on cPanel
- How to Configure Email Routing in cPanel
- How to enable memcached on cPanel shared hosting at WebHostingPeople
- How to Locate Your Email Settings in Webmail and cPanel
- Login to WordPress Dashboard From cPanel
- How to manage API Tokens in cPanel
- Manage Email Accounts Suspension in cPanel?
- The New HTTPS Redirection Feature in cPanel
- Migration from cPanel to Webmin/Virtualmin
- Migrate cPanel Account from cPanel to CWP
- Backup Exim Configuration
- cPanel’s Email Deliverability Interface
- How to Block Bots using Robots.txt File?
- All about cPanel Proxy Tool
- Automated Email Archiving in Roundcube
- Reset MySQL Installation in cPanel
- How to Enable Leech Protection in cPanel?
- Enable or Disable cPanel Analytics Feature at the User Account Level
- How to Edit Locales in cPanel & WHM?
- Install RVSiteBuilder on cPanel and DirectAdmin
- All about CSF Messenger Service
- Fix cPanel FTP Failed to retrieve Directory Listing Error
- How to Disable cPanel, Webmail, WHM shortcut URLs
- Manage NodeJS Through cPanel
- Email Account Password Reset in cPanel and Webmail
- Modify IP Block Checking Time Interval in CSF
- Error While Adding Addon Domain in cPanel
- Enable Terminal Application for cPanel
- Message Highlighting in SquirrelMail
- How to Disable eximstats_spam_check Notifications
- How to Overcome FTP Max Connection from a Single IP in WHM/cPanel?
- Find the Potential Spammer Account in cPanel/Exim
- Setup Autoresponder in cPanel webmail
- Importing Email Forwarders using a CSV or Excel File in cPanel
- Migrate Email Accounts from Zoho to cPanel
- How to Manage Email Accounts Suspension in cPanel?
- How to View Archived Emails via Webmail?
- Email Archiving on cPanel Server
- How to Increase the Upload Size of MySQL Database in PhpMyAdmin on a cPanel Server?
- How to Install BigTree in cPanel/WHM Server?
- Enable Force Password Change for cPanel Accounts
- How to Change URL of the Joomla Website in cPanel?
- How to Add cPanel/WHM Server on WHMCS?
- How to Host Git Repositories on a cPanel Account
- Sent Attachments not showing in Horde Webmail?
- How to Optimize MySQL Database Using phpMyAdmin in cPanel?
- Multi Account Functions in cPanel
- cPanel/WHM – WHMCS Integration
- All about cPanel Customization
- All About cPanel Solo License
- How to Disable AutoSSL Email Notifications from cPanel
- cPanel Plugin File Generator
- Some Steps to Reduce Disk Space on cPanel Server (For VPS/Cloud Clients Only)
- How to change cPanel logout URL
- How to Replace MySQL With MariaDB on a cPanel Server?
- How to Reset cPanel Password of an Account from WHM?
- What is mod_pagespeed and how to enable it?
- cPanel Calendars and Contacts – CardDAV/CalDAV
- Manage Reseller’s IP Delegation in cPanel
- PageSpeed on cPanel Server
- RainLoop Webmail on cPanel
- Setting up Railgun on cPanel
- Modify cPanel & WHM News
- How to Install Redis and PHP-Redis on cPanel
- Importing Email Accounts using a CSV or Excel File in cPanel
- File Restoration in cPanel v68
- How to Copy Locales in cPanel and WHM?
- How to Reset MySQL Root Password and Restore Database Grants in cPanel Server?
- Install SitePad Website Builder in cPanel
- Permanent Redirection Rules in .htaccess File
- How to Uninstall AutoSSL for an Addon Domain
- Everything about cPanel Web Disk
- How to manage and install Patchman in cPanel
- Installing Softaculous on a cPanel Server
- Install ConfigServer ModSecurity Control in cPanel
- How to Reset cPanel Password?
- Managing Suspended Accounts in WHM
- SSL/TLS Status feature in cPanel
- Install ConfigServer MailScanner on cPanel Server
- Setup BoxTrapper in Webmail
- How to Install Concrete5 Manually in cPanel Server
- How to Change cPanel Style
- The management of domains in the cPanel Jupiter theme
- Show all articles (83) Collapse Articles
Technical
Security
Direct Admin
- Redirect Website /Path to Use HTTPS in DirectAdmin
- Set up DirectAdmin to Use a Remote MySQL Server
- Autodiscover Information For Mail Clients in DirectAdmin
- How to Use IPv6 Address in DirectAdmin
- Install WordPress on DirectAdmin Using Installatron
- Too Low or 0.00 Disk Usage in DirectAdmin
- Hostname and the servername you have set in DirectAdmin, do not match
- Install Zend OPcache in DirectAdmin
- Add Custom PHP Modules with Custombuild in DirectAdmin
- Add Reseller Account in DirectAdmin
- Install mod_ruid2 on DirectAdmin
- Install Redis and Redis-PHP in DirectAdmin
- Important Log File Locations in DirectAdmin
- Install Laravel on a DirectAdmin Server
- Install SitePad in DirectAdmin
- Migrate accounts from DirectAdmin to DirectAdmin
- How to Install Nginx on DirectAdmin
- LetsEncrypt Support in DirectAdmin Control Panel
- Directory Structure of DirectAdmin Explained
- Enabling Multiple PHP versions On DirectAdmin
- How to install suPHP on DirectAdmin
- DirectAdmin Password Reset or Recover Options
- DirectAdmin dead but subsys locked Error
- Reasons and Fixes for DirectAdmin License Expired Error
- The Best Web Hosting Control Panels – Overview
- FTP Management in DirectAdmin
- Access denied for user da_admin – MySQL error in DirectAdmin
- Setup Domain in DirectAdmin
- Manage SPAM Filters in DirectAdmin
- Install SSL Certificate in DirectAdmin
- How to manage Autoresponders in DirectAdmin
- SpamAssassin Setup in DirectAdmin
- Backup Management in DirectAdmin
- MySQL Management in Direct Admin
- DNS Management in Direct Admin
- Manage Cron Jobs in Direct Admin
- DirectAdmin Installation
- Manage Email Accounts in DirectAdmin
- How to change the domain name in DirectAdmin
- How to Install a Free Let's Encrypt SSL Certificate on DirectAdmin
- Show all articles (25) Collapse Articles
WordPress
- How to Order Posts in Avada WordPress Theme
- Install Avada Theme
- Easy Digital Downloads Plugin for WordPress
- Guide for Creating a Multi-Lingual Website
- How to Fix the Japanese Keyword Hack in WordPress?
- Create a Job Board Website with WordPress
- How to change WordPress username?
- How to Choose a Page Builder for Your WordPress Site
- How to set up High Availability WordPress with HyperDB
- Migrate a WordPress site from localhost to Ubuntu VPS
- Prevent Brute Force Attacks in WordPress
- How much does it cost to build a website
- How to scale a WordPress website
- Creating a hashed upload directory structure in wordpress for sites with large amounts of files
- How to Change WordPress Site URLs (Best Methods)!
- Create Local Restaurant Website without a Developer
- How to Install WordPress on Webuzo?
- Create Local Business Website without a developer!
- How to Configure WordPress with External Database
- How to Fix WordPress Keeps Logging Out Error
- How to Fix Too Many Redirects Error in WordPress
- Setup Multiple WordPress Sites on one host a single VPS
- How to Setup Redis Object Cache on a WordPress Site
- LiteSpeed Cache is Disabled Warning on WordPress
- Fix the Mixed Content Issue on WordPress
- Create a Staging Site from WordPress Dashboard
- Install WordPress Using WordPress Manager
- How to Add Font Awesome Icons to Your WordPress Site?
- How to Install WordPress in ISPmanager?
- Adding Official LinkedIn Share Button in WordPress
- Enable Litespeed Cache for All WordPress Websites in cPanel
- How to Force Logout All Users in WordPress?
- How to Fix Render-Blocking JavaScript and CSS in WordPress
- How to Disable Wp-Cron and Replace It with A Real Cron Job
- Easy WP SMTP Plugin
- How to Fix SMTP ERROR: Failed to connect to server: Connection refused (111) error on WordPress
- Install WordPress Theme Using FTP Client Filezilla
- Blogger to WordPress Redirection Using Plugin
- WordPress Backup Restoration from Softaculous
- Install WordPress Manually from cPanel
- Install WordPress on cPanel Using Site Software
- How to Repair Database Through WordPress Dashboard?
- Remove Dashboard Access in WordPress
- How to Enable Private Mode on WordPress Website?
- Secure WordPress Template for an WebHostingPeople VPS (PHPMMDROP)
- Using WP-CLI with WebHostingPeople shared hosting
- WordPress Redirection Using Plugins
- How to setup WordPress Two-Factor Authentication
- How to Manually Downgrade WordPress to The Previous Version?
- How to Disable Pingbacks and Trackbacks in WordPress
- How to Add Google Analytics to WordPress?
- Change WordPress Admin Username from Dashboard
- How to Solve Leverage Browser Caching Warning in WordPress?
- How to Clear WordPress Cache with W3 Total Cache and WP Super Cache?
- How to Create an Art Portfolio Website Using WordPress CMS?
- How to resolve “Could not write you may be over quota: Bad file descriptor” Error
- How to Disable RSS Feeds in WordPress?
- How to add HTML to a WordPress Page or Post?
- How to Change Footer Text in WordPress?
- How to Configure WordPress Email to Use SMTP Server?
- How to Enable or Disable WordPress Automatic Updates
- How to Show or Hide Widgets on Specific WordPress Pages
- How to Restrict IP Addresses from Accessing WordPress Dashboard?
- How to Change WordPress Theme by Editing Database?
- Disable WordPress Plugins via phpMyAdmin
- How to Correct Image Links After WordPress Migration
- Create New Admin Account in WordPress via MySQL
- How to Enable PHP Error Log for WordPress Sites
- WooCommerce a Free WordPress Plugin for eCommerce
- How to Protect WordPress from XML-RPC Attacks
- Why WordPress is the Best Blogging Platform?
- 404 Error Page When Logging Into WordPress Admin Page
- Fix WordPress Error – Sorry, This File Type Is Not Permitted For Security Reasons
- How to Configure Secure Updates and Installations in WordPress
- Installation, Configuration and Features of Wordfence Security
- How To Fix “Error Establishing Database Connection” In WordPress
- How to Fix the WordPress Login Page Refreshing and Redirecting Issue
- WordPress – Changing Site URL and Home Settings
- Reset WordPress Admin Password Using Emergency Password Reset Script
- Fix : WordPress has failed to upload. Unable to create directory.
- About WordPress Nonces
- Choosing a Gallery Plugin for your WordPress Site
- How to Reset WordPress Password?
- Types of WordPress Caching
- Why Do WordPress Sites get Hacked and How to Prevent It?
- About WordPress multisite and it’s features
- How to Update WordPress Manually via FTP
- WordPress Files and Directory Structure
- The most common wordpress compromises of 2015
- What is Permalink and the best practices
- How to Set Permalinks in WordPress
- Change Time Zone in WordPress
- How to Change Site Title and Tagline in WordPress
- How to Change Site Language in WordPress
- How to Create WordPress Theme
- How to Secure WordPress
- WP-CRON
- How to Move WordPress to a New Domain without Affecting SEO
- How to quickly change the wordpress site url editing wp-config.php
- YoastSEO Sitemap XML 404 Not Found
- Migrating from BlogSpot to WebHostingPeople WordPress Hosting
- Migrating from Wix to WebHostingPeople WordPress Hosting
- Migrating from Weebly to WebHostingPeople WordPress Hosting
- Move from WordPress.com to WebHostingPeople WordPress Hosting
- Install WordPress from Plesk
- Free Hacked WordPress Cleanup
- Install WordPress using Softaculous in cPanel
- Install WordPress over SSH
- Adding language translations to your site
- Creating and Using Sitemaps: The Basics
- How to add Poll to WordPress
- How to Automatically Cross-Post Your WordPress Posts to Both Medium and LinkedIn Publishing
- How to Fix the WordPress White Screen of Death(WSoD)
- Why You Should Manually Install WordPress Instead of Using Fantastico (and How to Do It)
- How to use WordPress SEO by Yoast
- Short codes in WordPress explained
- How to Use Widgets in WordPress
- How to set up Memcached on CentOS 6 and configure WordPress to use it
- How to Remove Tabs from the WordPress Administrator Dashboard
- How to Remove /wordpress/ from Your WordPress Blog URL
- How to Schedule a Post in WordPress
- How to Reset Your Administrator Password in WordPress
- How to Update WordPress
- How to Protect Your WordPress Blog from Spam with Akismet
- How to Stop WordPress from Creating Additional Image Sizes
- How to Set up Gravatar on WordPress
- How to Moderate Reader Comments in WordPress
- How to Make Your WordPress Site Mobile-Friendly
- How to Make Your WordPress Site SEO-Friendly
- How to Install a Child Theme in WordPress
- How to Install AdSense on Your WordPress Blog
- How to Make Your WordPress Blog Pinterest Friendly
- How to Install Plugins in WordPress
- How to Install a Theme on Your WordPress Blog
- How to Customize the 404 Page for Your WordPress Site
- How to Disable Plugins in WordPress
- How to Enable a Maintenance Mode for Your WordPress Blog
- How to Create a Favicon for Your WordPress Blog
- How to Back Up Your WordPress Blog
- How to Add Google Search to Your WordPress Site
- How to Add Social Media Buttons to WordPress Posts
- How to Add Google Maps to Your WordPress Blog
- How to Check Your WordPress Site for Broken Links
- How to Add an RSS Feed to Your WordPress Blog
- How to Add an Image Gallery to Your Sidebar in WordPress
- How to Add a PayPal Shopping Cart to Your WordPress Blog
- How to Add a YouTube Video to Your WordPress Posts
- How to Add a Bitcoin Donate Button to your wordpress blog?
- How to Add Custom Images Sizes to WordPress
- How to Add a Static Front Page to Your WordPress Blog
- How to Add a Poll to Your WordPress Blog
- How to Add and Manage Categories in WordPress
- How to Add a Contact Form to Your WordPress Blog
- Example of writing a simple WordPress Plugin
- Adding Audio and Video to Word Press Blog Post
- Show all articles (140) Collapse Articles
Dedicated Server
VPS Hosting
E-commerce
- The top 10 best content management systems in 2022!
- Best Applications to Run E-commerce Websites
- WooCommerce vs Shopify : The best E-commerce platforms
- How to Reset Magento Admin Password
- Change Magento Base URL without accessing Admin Dashboard
- A guide on modifying Magento website URLs
- Configure Different Payment Methods in WooCommerce
- Change Favicon in Magento2
- Enable Admin Login Captcha in Magento2
FTP Tutorial
- 6 Best SFTP Clients for Windows and Mac Users
- A guide on how to execute site-to-site file transfers using the FlashFXP FTP client
- How to Increase FTP Visible File Limits
- Install ProFTPD in Webmin
- What is the process for transferring WHM backups to a remote destination using FTP?
- How to Enable FTP Access in WHM?
- How to Create and Manage FTP Accounts in VestaCP
Websites Migration
- How to Create and Manage FTP Accounts in VestaCP
- Migrate accounts from cPanel to DirectAdmin
- cPanel to Webuzo Migration
- How can emails be migrated using imapsync?
- Migrating from cPanel to CentOS Web Panel
- Migration from Media Temple to WebHostingPeople
- The migration of A Small Orange to WebHostingPeople cPanel
- Migration from Web Hosting Hub to WebHostingPeople cPanel
- Migration from 1&1 to WebHostingPeople
- Migration from GreenGeeks to WebHostingPeople
- Migration from HostPapa to WebHostingPeople
- Migration from SiteBuilder to WebHostingPeople
- Moving from SiteGround to WebHostingPeople
- Migration from A2 Hosting to WebHostingPeople
- Moving from HostGator to WebHostingPeople
- Moving from GoDaddy to WebHostingPeople
- What is the process for migrating emails using IMAP Copy?
- A guide on how to transfer email accounts from one cPanel to another cPanel
- Import data from cPanel
- What is the process for transferring a cPanel account from WHM?
- Migration from FastComet to WebHostingPeople
- Transferring a website to another host using cPanel
- Migration from Contabo to WebHostingPeople cPanel
- Migration from Hostinger to WebHostingPeople
- Migration of JustHost to WebHostingPeople cPanel
- InMotion Hosting to WebHostingPeople Migration
- Migration from Arvixe to WebHostingPeople cPanel
- Migration from LiquidWeb to WebHostingPeople
- Migration of BlueHost to WebHostingPeople cPanel
- Migration of cPanel from HostMonster to WebHostingPeople
- Migration from Namecheap to WebHostingPeople cPanel
- How to Fix the Common MySQL Errors?
- How to upgrade the MariaDB or MySQL version in Linux
- Mytop can be used to monitor MySQL.
- phpMyAdmin Performance Settings
- Fix : check_mysql Has Determined That There Are Corrupted Database Tables (eximstats)
- How to Enable Remote MySQL Connection in WHM?
- Show all articles (22) Collapse Articles